The current version of the CereTax for Business Central App is 1.0.0.34. Updates can be applied through the Dynamics 365 Business Central admin center.
CT_Admin permissions are required to complete installation & setup
Installing and setting up CereTax for D365 Business Central
Installing CereTax
Follow the steps below for installing the CereTax extension:
Navigate to System Administration > General> System > Extension Management
Select Manage > Extension Marketplace
In the search bar, search for “CereTax”
Select the “CereTax for D365 Business Central” app in the results.
Select “Free Trial” on the app page and Confirm to continue with the installation.
On the “Extension Installation” card, click “Install”.
Integration Setup
After the CereTax extension for Microsoft Dynamics 365 for Business Central is installed, the next step is to go through the initial integration setup, which consists of connecting to the CereTax platform, creating CereTax tax groups, and loading CereTax data.
To begin Go to CereTax > CereTax Integration Setup
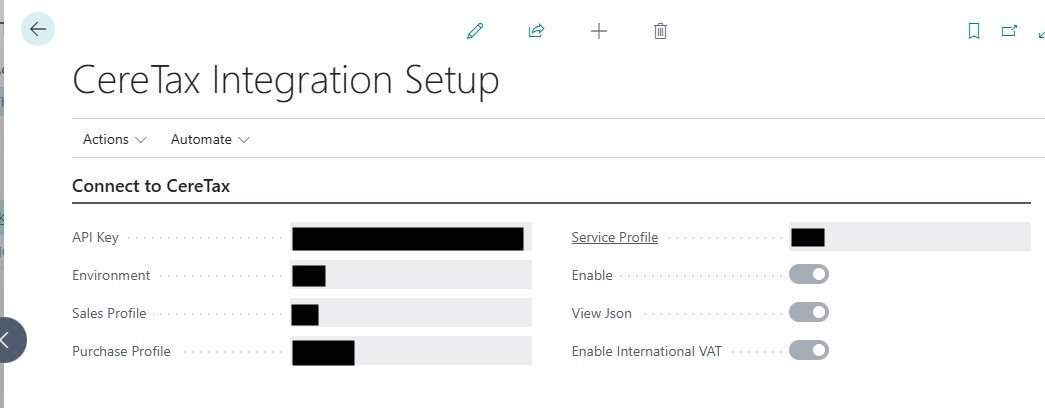
Connect to CereTax
This step sets up and tests the connection between Business Central and CereTax. Under “Connect to CereTax”, do the following:
Enter your CereTax API Key.
Select the CereTax environment you are connecting to.
Enter your Sales and/or Purchase profiles.
For Service profile enter the same as the Sales profile
Toggle “Enable” to ON - ON: CereTax integration is enabled - OFF: CereTax integration is disabled
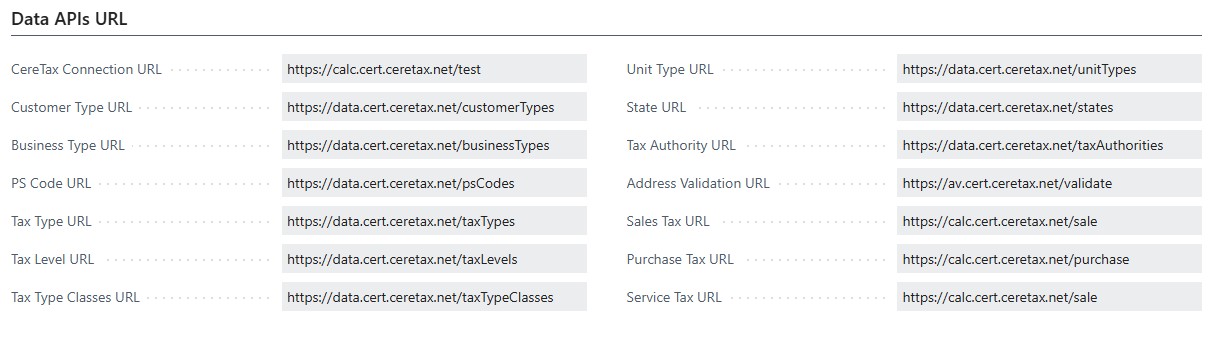
API URLS
Under “Data APIs URL” at the bottom of the CereTax Integration Setup page, enter the URLs below based on the environment you selected in step 2.
API
CERT
Production
CereTax Connection URL
https://calc.cert.ceretax.net/test
https://calc.prod.ceretax.net/test
Customer Type URL
https://data.cert.ceretax.net/customerTypes
https://data.prod.ceretax.net/customerTypes
Business Type URL
https://data.cert.ceretax.net/businessTypes
https://data.prod.ceretax.net/businessTypes
Seller Type URL
https://data.cert.ceretax.net/sellerTypes
https://data.prod.ceretax.net/sellerTypes
PS Code URL
https://data.cert.ceretax.net/psCodes
https://data.prod.ceretax.net/psCodes
Tax Type URL
https://data.cert.ceretax.net/taxTypes
https://data.prod.ceretax.net/taxTypes
Tax Level URL
https://data.cert.ceretax.net/taxLevels
https://data.prod.ceretax.net/taxLevels
Tax Type Classes URL
https://data.cert.ceretax.net/taxTypeClasses
https://data.prod.ceretax.net/taxTypeClasses
Tax Situs Rule URL
https://data.cert.ceretax.net/taxSitusRules
https://data.prod.ceretax.net/taxSitusRules
Unit Type URL
https://data.cert.ceretax.net/unitTypes
https://data.prod.ceretax.net/unitTypes
State URL
https://data.cert.ceretax.net/states
https://data.prod.ceretax.net/states
Tax Authority URL
https://data.cert.ceretax.net/taxAuthorities
https://data.prod.ceretax.net/taxAuthorities
Address Validation URL
https://av.cert.ceretax.net/validate
https://av.prod.ceretax.net/validate
Sales Tax URL
https://calc.cert.ceretax.net/sale
https://calc.prod.ceretax.net/sale
Purchase Tax URL
https://calc.cert.ceretax.net/purchase
https://calc.prod.ceretax.net/purchase
Service Tax URL
https://calc.cert.ceretax.net/sale
https://calc.prod.ceretax.net/sale
Test Connection
Open the Actions menu and Select “Test Connection”.
If the test connection was successful, proceed to the next set of steps.
If the test connection was not successful, follow the steps in the pop-up window.
Loading CereTax Data
Next, the job queue that loads and keeps CereTax master data up to date must be restarted.
Go to System Administration > General >Job Queue > Job Queue Entries
Select the Job named “CT_MasterUpdateUtility”
In the menu bar, select “Restart”, and then select “Run once (foreground)” and confirm the one-time job run.
After the one-time job run completes, confirmation windows will display for each data entity that was successfully updated.
General Settings
Navigate back to CereTax > CereTax Integration Setup to continue configuring the integration settings. Under “General” tab, manage the following settings:
1. Enable CereTax on Sales Transactions
ON: Business Central uses CereTax to calculate tax.
OFF: Business Central uses standard out of the box sales tax functionality.
2. Enable CereTax on Purchase Transactions
ON: Business Central uses CereTax to calculate tax.
OFF: Business Central uses standard out of the box sales tax functionality.
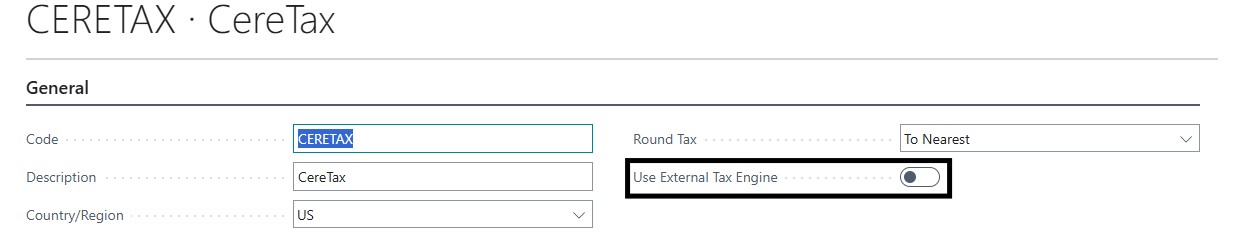
3. Default Tax Area Code
Open the “Default Tax Area Code” drop-down and select +New.
Enter “CERETAX” in the Code field for the Tax Area and click OK.
A warning will open asking if you want to continue, click Yes.
Ensure 'Use External Tax Engine' is set to OFF
4. Default Tax Group Code
Open the Default Tax Group Code drop-down and select +New.
Enter “CERETAX” in the Code field for the Tax Group and click OK.
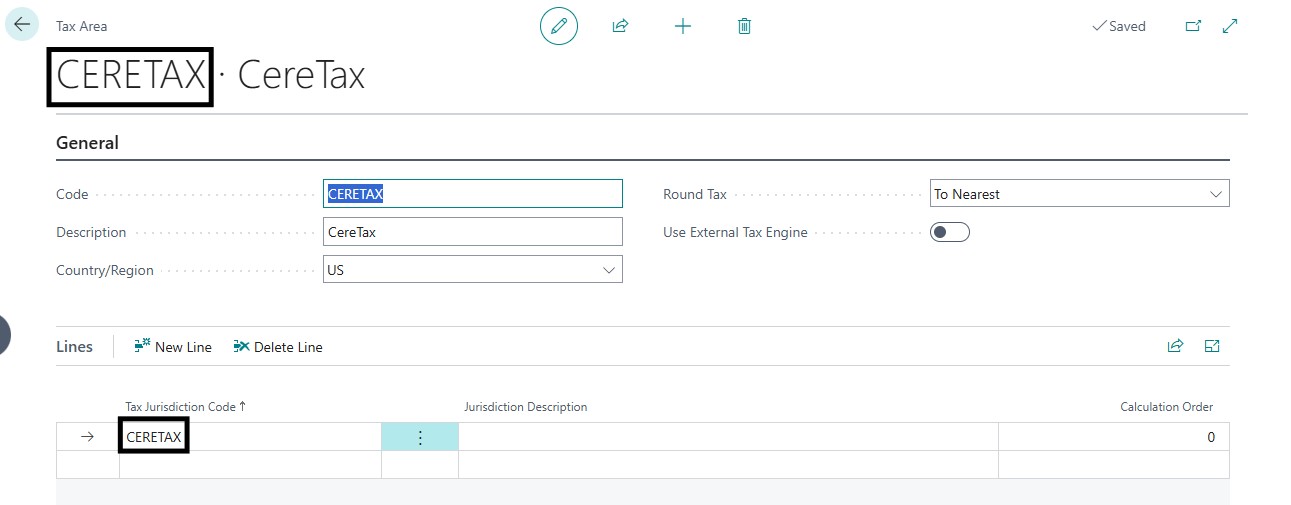
5. Set up initial tax jurisdiction
Create a tax jurisdiction with the code “CERETAX” along with its corresponding tax account.
Assign the newly created tax jurisdiction to the “CERETAX” tax area code.
GL Posting Settings
Under the “GL Posting” tab, make selections for the following fields:
Sales GL Posting Account: Select the GL Posting Account for posting tax entries for Sales transactions. If you are not using CereTax to calculate tax on sales, no selection is required.
Purchase GL Posting account: Select the GL Posting Account for posting tax entries for Purchase transactions. If you are not using CereTax to calculate tax on purchases, no selection is required.
Use Tax GL Posting Account: Select the GL Posting Account for posting tax entries for Use Tax on Purchase transactions. If you are not using CereTax to calculate tax on purchases, no selection is required.
Address Validation Settings
Under the Address Validation tab, manage the following settings:
1. Enable Address Validation: User can toggle this setting on or off.
ON: Select this option to enable Address Validation.
OFF: Select this option to disable Address Validation.
2. Validate Address on Sales Transaction: User can toggle this setting on or off.
ON: This will mean that CereTax will validate addresses on all sales transactions.
OFF: This will mean that CereTax will not validate addresses on all sales transactions.
3. Validate Address on Purchase Transaction: User can toggle this setting on or off.
ON: This will mean that CereTax will validate addresses on all purchase transactions.
OFF: This will mean that CereTax will not validate addresses on all purchase transactions.
Sales Settings
Under the Sales Invoice Defaults tab, make selections for the following fields:
Sales Business Type: Select Business Type for Sales Transactions
Sales Customer Type: Select Customer Type for Sales Transactions
Ship-to Address Option for CM & RO: The selection here defines the address that will be used to calculate tax on return orders and credit memos that do not reference a posted invoice. Select Ship To, Sell-To, or Bill-To.
Under the Sales Line Item Defaults tab, make selections for the following fields:
Sales Unit Type: Select Unit Type for Sales Transactions
Sales PS Code: Select PS Code for Sales Transactions
Purchase Settings
Under the Purchase Invoice Defaults tab, make selections for the following fields:
Purchase Business Type: Select Business Type for Purchase Transactions.
Purchase Customer Type: Select Customer Type for Purchase Transactions.
Under the Purchase Line Item Defaults tab, make selections for the following fields:
Purchase Unit Type: Select Unit Type for Purchase Transactions.
Purchase PS Code: Select PS Code for Purchase Transactions.
Customer Settings
Required Customer Settings
If CereTax is enabled for Sales, the Tax Area Code for customers must be set to CERETAX.
The Tax Area Code can be updated on the Customer Card under the “Invoicing” tab.
The Tax Area Code can be updated for multiple customers on the Customer List page:
Select 1 or more customers on the Customer listpage
From the menu bar, open Actions > Functions> Assign Tax Area
Select “CERETAX” from the Tax Area Code drop-down.
Select OK
Optional Customer Settings
There are optional settings that can be configured on the Customer card in Business Central.
Customer Type
To assign an individual customer type a value that is different than what was configured in the integration settings, do the following:
Go to Sales > Customers.
Create a new customer or select an existing customer.
Expand the “CereTax Customer Setting” tab.
Select a Customer Type to be used on sales transactions for the Customer. A selection made here will override the selection in the Sale settings for this Customer.
Customer Exemptions
To assign exemptions to individual customers, do the following:
Go to Sales > Customers.
Create a new customer or select an existing customer.
Expand the “Customer Exemption Subform” tab within the “CereTax Customer Setting” tab.
Select the applicable exemption criteria (state, tax level, tax type, and/or tax type class) from the dropdowns.
Define the exemption Percent, the default is 1.00 or 100%.
Define a Reason for the exemption, ex. “Resale”.
To delete an exemption from a customer:
Open the “Show more options” menu on the exemption row you wish to delete.
Select “Delete Line” from the menu.
Confirm you want to delete the exemption record.
Vendor Settings
Required Vendor Settings
If CereTax is enabled for Purchases, the Tax Area Code for vendors must be set to CERETAX.
The Tax Area Code can be updated on the Vendor Card under the “Invoicing” tab.
Optional Customer Settings
There are optional settings that can be configured on the Vendor card in Business Central.
Customer Type
To assign an individual customer type a value that is different than what was configured in the integration settings, do the following:
Go to Purchasing > Vendors.
Create a new vendor or select an existing vendor.
Expand the “CereTax Vendor Setting” tab.
Select a Customer Type to be used on purchase transactions for the Vendor. A selection made here will override the selection in the Sale settings for this Customer.
Vendor Exemptions
To assign exemptions to individual vendors, do the following:
Go to Purchasing > Vendors.
Create a new vendor or select an existing vendor.
Expand the “Vendor Exemption Subform” tab within the “CereTax Vendor Setting” tab.
Select the applicable exemption criteria (state, tax level, tax type, and/or tax type class) from the drop-downs.
Define the exemption Percent, the default is 1.00 or 100%.
Define a Reason for the exemption, ex. “Resale”.
To delete an exemption from a vendor:
Open the “Show more options” menu on the exemption row you wish to delete.
Select “Delete Line” from the menu.
Confirm you want to delete the exemption record.
Product-related Settings
Required Product Settings
If CereTax is enabled for Sales or Purchases, the Tax Group Code of any Items, G/L Accounts, Resources, and/or Fixed Assets that will be used on transactions must be set to CERETAX for tax to calculate correctly.
The Tax Group Code can be updated on the individual Item, G/L Account, Resource, or Fixed Asset records in Business Central.
Optional Customer Settings
There are optional product-related settings that can beset-up on Items, G/L Accounts, Resources, and Fixed Assets. Each of these entities has a “CereTax Product Setting” tab where a PS Code can be assigned. Any selection made on this tab will override the default PS Code selected on the integration settings page.
To assign a PS Code to an Item, G/L Account, Resource, or Fixed Asset, do the following:
Open the card of the record you wish to assign a PS Code.
Expand the “CereTax Product Setting” tab.
Select a PS Code from the drop-down.
Save the record.
Item Charges
Item charges codes can be set up to support calculating taxon shipping, handling, insurance, and other miscellaneous transaction charges. To set-up an item charge, do the following:
Select “Edit List” from the Item Charges menu.
Select an existing Item Charge or create a new Item Charge record.
One the record being configured, make the following selections within the Item Charge table:
TransactionCharge type: Select a charge type for the item charge.
Freight on board: If the charge type is “Shipping” or “Shipping and handling”, select a freight on board option for the charge code.
Delivery type: If the charge type is “Shipping” or “Shipping and handling”, select a delivery type option for the charge code.
Mandatory charge: Indicate if the charge is mandatory or not.
Tax Group Code: Select “CERETAX”
Calculating Tax on Transactions
Tax Calculation Triggers
Tax is calculated on a sales and purchase transactions anytime one of the following tasks is performed:
Open the Statistics page
Release a document
Preview Posting
Post a document
Viewing Tax Details
After tax is calculated on a transaction, the details of the tax calculated can be viewed by opening the “CereTax Sales Tax Log” from the “CereTax” menu on the transaction.
The “CereTax Sales Tax Log” will display a detailed break-down of tax for every line on the transaction.
Address Validation
The address validation component of the CereTax integration attempts to validate and normalize addresses and determine an address' physical location, up to rooftop-level precision. Address validation can be performed on individual addresses or a batch of addresses. Address validation is available for Customer, Vendor, and Warehouse locations.
Individual address validation
Individual address validation can be performed by following these steps:
Navigate to an existing Customer, Vendor, or Warehouse record and open the record.
Open the “CereTax” menu, select “Validate Address”, and confirm you want to validate.
After the validation is complete, a results window will open showing the original Submitted Address and the Validated Address. If you agree with the results, select Accept and navigate back to the Customer Card.
Bulk address validation
This step enables you to validate and review multiple addresses at once.
Note: There is a max limit of 100 addresses to be validated at one time
Navigate to your Customer, Vendor, or Warehouse list.
Open the “Show more options” menu on any record and choose “Select more”.
Select all the records you wish to validate the addresses for.
After all applicable addresses are selected, open the CereTax menu and select Validate Address.
Confirm you want to validate the selected addresses.
After the bulk address validation is complete, the “Address Validation Requests” window will open and show the results for all the selected addresses. Any addresses highlighted in red could not be successfully validated and should be reviewed. An error message and error summary is available for each record and indicates why the address could not be validated.
To accept the addresses that successfully validated, do the following:
Open the “Show more options” menu on any record and choose “Select more”.
Select all the validated addresses you wish to accept and click Accept in the menu bar.
After you are done accepting the validated address results, you can navigate back to the Customer, Vendor, or Warehouse list.
The Address Validated checkbox will be checked for any address that has already been validated and accepted. You can use this indicator to exclude previously validated addresses when re-running bulk address validation.
Tax Calculation and Address Validation Logs
The CereTax extension maintains logs for each transaction request on Sales and Purchase transactions, and each address validation request. These logs can be accessed by opening the CereTax menu and selecting Logs.
Transaction Logs
The transactions logs will show the Business Central Document No and CereTax transaction Id (KSUID) for each request, along with other relevant details of the transaction request, including any errors recorded.
Sales Transaction Logs
Purchase Transaction Logs
Address Validation Logs
The address validation logs will show the full history of address validation within Business Central. The logs will include successful and unsuccessful address validations, along with detailed error information.
Uninstalling and Updates
Installing a CereTax App Update
When a new version of the CereTax app is made available, it can be applied from the Dynamics 365 Business Central admin center. Follow the steps below to manually update the CereTax app:
1. Log into the D365 Business Central Admin Center.
2. Select the environment CereTax is installed on.
3. Select "Apps" in the top left corner of the menu bar.
4. Search for CereTax from your list of installed apps. If a new version is available, and "Install Update" option will be present.
5. Click on "Install Update".
6. Confirm you want to install the update. You can optionally select to install the new version in the next Business Central update window if needed.
After the installation if confirmed, the app update will be immediately installed. You can refresh the Apps page to see the status of the app update.
More information related to app updates can be found on Microsoft's Managing Apps article.
In some cases, app updates may be installed automatically by Microsoft.
Installed apps will always update when the environment updates to a new major or minor version if the app update is required for the Business Central version the environment is updating to, for example when the app developer has indicated that the installed version of the app is not compatible with the Business Central version your environment is updating to. Additionally, all apps update to the latest version when an environment updates to a new major version of Business Central.
Multi-entity management support
How do I use the multi-entity management with profiles?
Enable under MEM settings on the CereTax settings page
Select the group of entities you wish to define profiles for
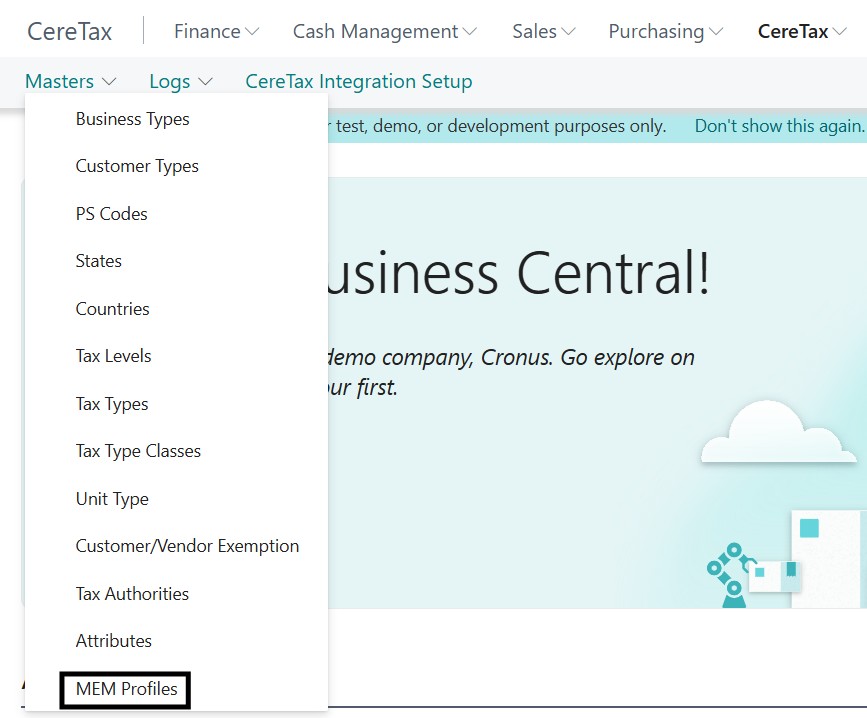
Click the MEM Profiles under Masters on the CereTax Menu
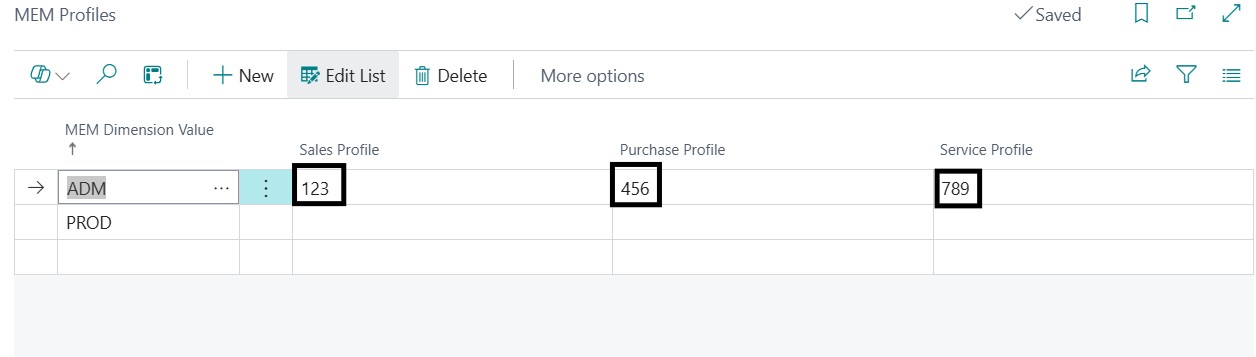
Click Edit List
Fill in the profile values you want to use for each dimension, you can set a different value for sales, purcahses, and services
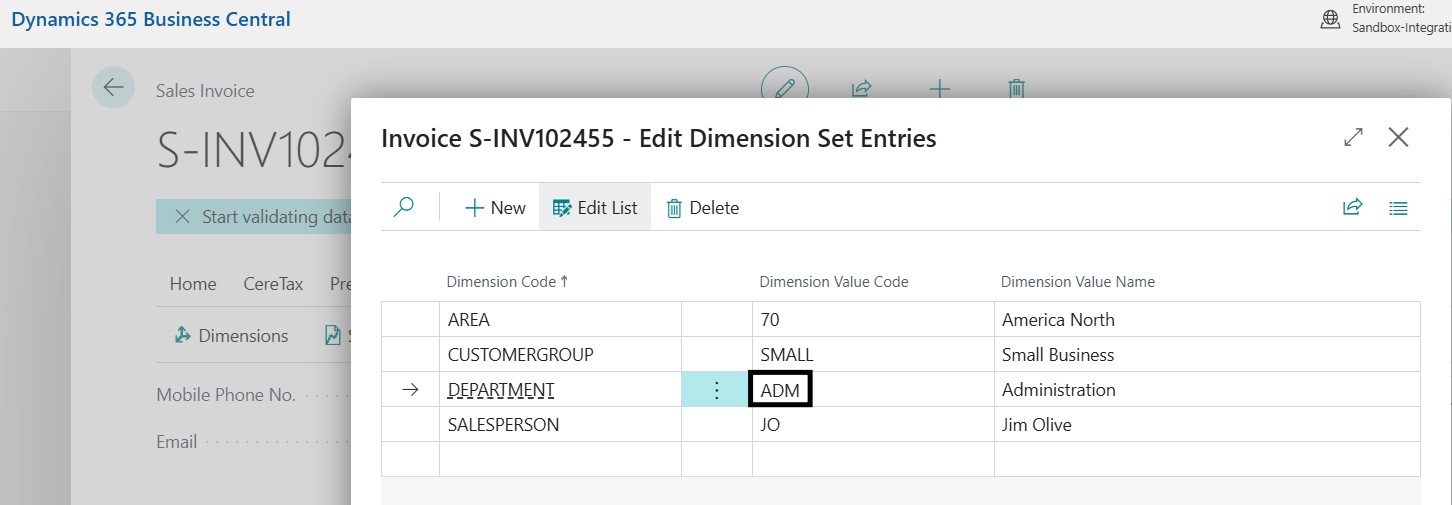
When processing a transaction, ensure values in the dimension match the group and entity configured in the MEM profile settings
See Invoice --> Dimensions on a given transaction
If no value is configured for the given dimension, the profile used will be taken from the main CereTax settings profiles
Uninstalling the CereTax Extension
Follow the steps below to uninstall the CereTax extension:
Navigate to System Administration > General> System > Extension Management.
In the search bar, search for “CereTax”.
Select the CereTax extension.
Select Manage > Uninstall.
In the “Extension Uninstallation” window, click Uninstall.
A confirmation window will open after the extension is successfully uninstalled.
After the CereTax extension is uninstalled, you will need to reconfigure the Tax Area Codes and Tax Groups Codes based on how you will be managing sales and use tax calculation without the CereTax extension.