Installing and setting up CereTax for Salesforce B2C Commerce SFRA + Legacy (SiteGenesis)
Installing CereTax B2C Commerce SFRA
Before beginning the installation process, ensure the following prerequisites are met:
Administrative Access to B2C Commerce Instance
You must have administrator-level access to your Salesforce B2C Commerce (SFCC) instance to perform tasks such as uploading cartridges, managing site preferences, and configuring Business Manager Settings.
Familiarity with Code Deployment Tools
You should be comfortable using code deployment tools such as Visual Studio Code(VS Code)
CereTax API Credentials
Ensure you have the necessary API key (Provided by CereTax team) for at least one environment — Sandbox or Production — to successfully connect with the CereTax platform during integration
CereTax Profile ID
A valid Profile ID, issued by CereTax, is required to authenticate and associate your organization’s tax transactions with the appropriate configuration in the CereTax system
Deployment Instructions
locate the cartridge from the Salesforce marketplace
Download the zip file
Download Base cartriges from Salesforce B2C Commerce
navigate to business manager --> Administration --> Code deployment
identify the active code version
click download to export the existing base cartridges
Extract downloaded files
unzip both the ceretax cartridge zip as well as the base cartridge zip from your B2C instance
open Visual Studio Code
Open base cartridge folder in VS Code
open file in Vs Code
Select the extracted base cartridge folder
this folder will now serve as your working directory
add CereTax plugin cartridge to base folder
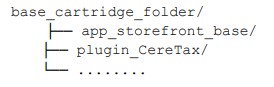
locate the folder names plugin_CereTax from the downloaded zip file
drag and drop the entire plugin_CereTax folder into the root of the base cartridge directory in VS Code
ensure the structure remains the appropriate folder hierarchy
in VS Code, go to extensions and install: Prophet Debugger Extension
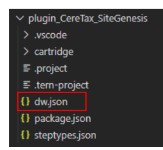
configure dw.json:
inside the CereTax cartridge root folder, create a file names dw.json and paste it
open the command palette (Ctrl + Shift + P) > Run Prophet: Clean Project/Upload all
ensure the cartridge is uploaded to the correct code version
configure cartridge path
navigate to Administration > Sites > Manager Sites> <Your Site ID> > Settings
Add plugin_CereTax before app_storefront_base in the Cartridge Path
Import Metadata (see below for configuring metadata)
Log in to Business Manager > Administration > Site Development > Site Import & Export
Create the .zip format of metadata folder located int he metadata folder of the cartridge
Import the metadata file
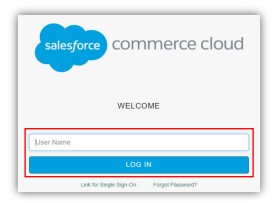
Login to Business Manager
Open your browser and log in to your Salesforce B2C Commerce instance using the following URL pattern:https://-.commercecloud.salesforce.com/on/demandware.store/SitesSite/default/ViewApplication-DisplayWelcomePageReplace <realm> and <instance> with your specific instance details.
Once logged into Business Manager, navigate to Administration > Site Development> Code Deployment and ensure that the correct code version is active. Confirm that the cartridge has been successfully uploaded to this code version. This ensures the latest codebase, including the CereTax integration, is available for use.
add plugin_CereTax to site cartridge path
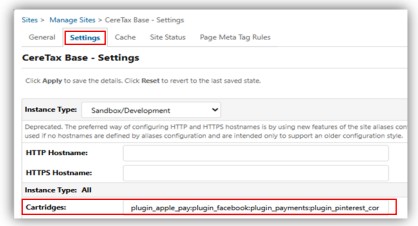
Navigate to Merchant Tools > Sites > Manage Sites and select the site where you want to enable the CereTax plugin.
Click on the Settings tab to select the site.
In the Cartridges field, add plugin_CereTax at the beginning of the cartridge path. This prioritizes the plugin during the execution sequence.
Click Apply to save the changes.
Steps for importing the metadata file
In the root directory of the CereTax cartridge, you will find a folder named metadata.
Create a ZIP File:
Navigate to the metadata folder.
Compress its contents into a .zip archive.
Access Site Import & Export in Business Manager:
Log in to Business Manager.
Navigate to: Administration → Site Development → Site Import & Export
Upload the Metadata File:
Under the Import section, select Choose File under the Local tab.
Select the .zip file you created from the metadata folder.
Click Upload to upload the file to the server.
Import the Metadata:
After uploading, the file will appear under a path such asinstance/metadata.zip or a similarly named folder.
Select the appropriate folder containing your ZIP file (e.g., instance/metadata.zip).
Click Import to begin the metadata import process.
Verify the Imported Metadata:
Once the import is complete, metadata such as custom preferences, system objects, and configurations will be created with their default values.
To verify:
Navigate to Merchant Tools
Select your configured site
Go to Site Preferences → Custom Preferences -> CereTax Configuration
Configure custom preferences in Business Manager
After successfully importing the metadata, follow the steps below to configure the custom preferences required to activate the CereTax integration:
Navigate to Custom Preferences:
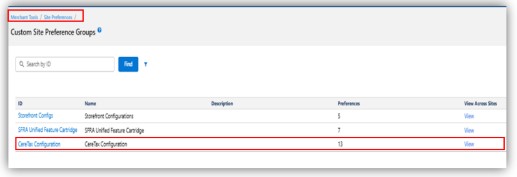
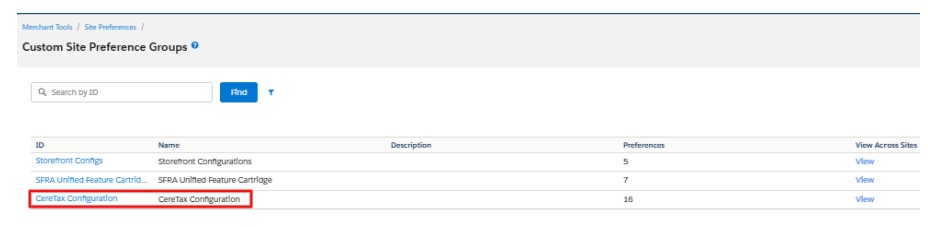
In Business Manager, go to: Merchant Tools > Site Preferences > Custom Site Preference Groups > CereTax Configuration
Access the Configuration Panel:
Click on CereTax Configuration to open the settings panel.
You will see a screen displaying various custom preference fields specific to the CereTax integration.
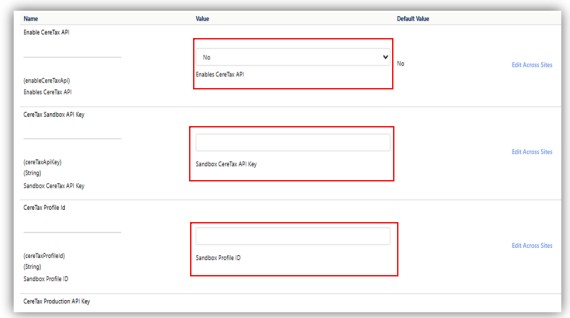
Enable CereTax Integration:
Locate the Enable CereTax checkbox or toggle.
Set this to yes or checked to activate the plugin for the selected site.
Configure Required API Credentials:
API Key: Enter the API Key provided by CereTax. This key is used to authenticate requests to the CereTax service
Profile ID: Enter the Profile ID corresponding to your account/environment on CereTax.
Once all required fields are updated, click Apply or Save at the bottom of the page to store the changes
CereTax PsCode Configuration at Product Level
CereTax either provides a link or a CSV file through which customers can configure the PS Code on each product in the b2c commerce cloud.
To ensure accurate tax calculation with CereTax, you must assign the appropriate PS Code to each product at the site level.
Steps to Configure the CereTax PS Code:
Navigate to the Product:
In Business Manager, go to: Merchant Tools > Products and Catalogs > Products
Search for and select the product you want to configure by entering the ProductID or Product Name
Access General Product Settings (Customer needs to follow these steps for each product):
On the product detail page, go to the general tab
Scroll down to find the CereTax PsCode field
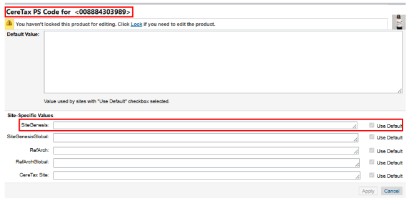
Set Site-Specific PS Code:
Click on All Site Values next to the CereTax PS Code field.
A new screen will open the PS Code configuration for all associated sites.
Enable Editing:
Click the Lock icon to unlock the fields for editing.
Configure the PS Code for Specific Site:
Uncheck the Use Default checkbox for the desired site
Enter the appropriate CereTax PS Code value for that site.
Save the Changes
Click Apply to save the updated PS Code value for the product.
Reporting
Advanced Order Search
To find orders based on their CereTax transaction ID (KSUID):
Log in to Business Manager
Navigate to Merchant Tools > Ordering > Orders.
Open the Advanced section in the filter panel (top of the page).
Scroll down or expand the Extended Attributes section.
Locate the field labeled CereTax KSUID.
Enter the relevant KSUID value and click Find or Search.
The system will return any order(s) that match the provided transaction ID.
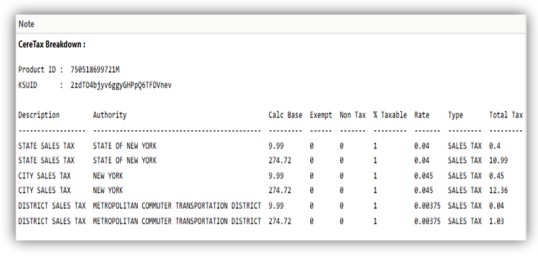
Sales Tax Breakdown
To view a detailed breakdown of taxes applied to an order:
Navigate to Merchant Tools > Ordering > Orders.
Search for and select the specific Order Number you want to review.
On the Order Detail page, go to the Notes tab.
Here, you will find a CereTax Tax Breakdown, which typically includes Tax jurisdiction details, Tax rates applied, taxable amounts, etc.
Before beginning the installation process, ensure the following prerequisites are met:
Administrative Access to B2C Commerce Instance
You must have administrator-level access to your Salesforce B2C Commerce (SFCC) instance to perform tasks such as uploading cartridges, managing site preferences, and configuring Business Manager Settings.
Familiarity with Code Deployment Tools
You should be comfortable using code deployment tools such as Visual Studio Code(VS Code)
CereTax API Credentials
Ensure you have the necessary API key (Provided by CereTax team) for at least one environment — Sandbox or Production — to successfully connect with the CereTax platform during integration
CereTax Profile ID
A valid Profile ID, issued by CereTax, is required to authenticate and associate your organization’s tax transactions with the appropriate configuration in the CereTax system
Access to Cartridge GitHub repository
To begin working with the CereTax cartridge for Salesforce B2C Commerce Cloud, you must first gain access to the GitHub repository that hosts the cartridge codebase. This repository contains all necessary source files, configuration examples, documentation, and scripts required to install, configure, and maintain the cartridge. CereTax will share a git repository link with customers.
Deployment Instructions
Download CereTax Site Genesis Cartrige from GitHub
CereTax will provide GitHub repository link where the CereTax Site Genesis cartridge is hosted
Locate the desired branch
Download the zip file
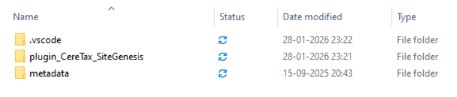
Extract Downloaded Files
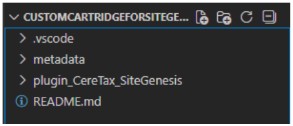
Unzip CereTax Site Genesis cartridge ZIP file from GitHub
Open Visual Studio Code (VS Code).
Open the extracted file int he Vs Code.
Additional Steps for Customized Cheeckout ISML Files
Locate Checkout Templates
Go to templates --> default --. checkout
If these ISML files are customize, retain your custom ISML files and copy the required code snippets from the plugin, pasting thme into the lcoations specified below.
ISML File-Specific changes:
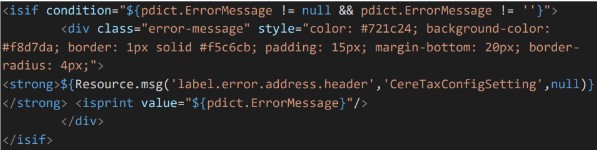
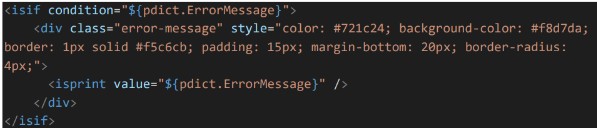
billing.isml and singleshipping.isml
Paste the following code inside the <fieldset> tag:
open the command palette (Ctrl + Shift + P) > Run Prophet: Clean Project/Upload all
ensure the cartridge is uploaded to the correct code version
Configure cartridge path
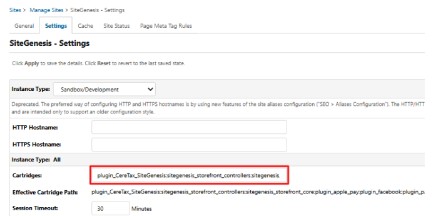
navigate to Administration > Sites > Manager Sites> <Your Site ID> > Settings
Add plugin_CereTax_SiteGenesis before app_storefront_base in the Cartridge Path
Import Metadata (see below for configuring metadata)
Log in to Business Manager > Administration > Site Development > Site Import & Export
Create the .zip format of metadata folder located int he metadata folder of the cartridge
Import the metadata file
Login to Business Manager
Open your browser and log in to your Salesforce B2C Commerce instance using the following URL pattern:https://-.commercecloud.salesforce.com/on/demandware.store/SitesSite/default/ViewApplication-DisplayWelcomePageReplace <realm> and <instance> with your specific instance details.
Once logged into Business Manager, navigate to Administration > Site Development> Code Deployment and ensure that the correct code version is active. Confirm that the cartridge has been successfully uploaded to this code version. This ensures the latest codebase, including the CereTax integration, is available for use.
add plugin_CereTax_SiteGenesis to site cartridge path
Navigate to Merchant Tools > Sites > Manage Sites and select the site where you want to enable the CereTax plugin.
Click on the Settings tab to select the site.
In the Cartridges field, add plugin_CereTax_SiteGenesis at the beginning of the cartridge path. This prioritizes the plugin during the execution sequence.
Click Apply to save the changes.
Steps for importing the metadata file
In the root directory of the CereTax SiteGenesis cartridge, you will find a folder named metadata.
Create a ZIP File:
Navigate to the metadata folder.
Compress its contents into a .zip archive.
Access Site Import & Export in Business Manager:
Log in to Business Manager.
Navigate to: Administration → Site Development → Site Import & Export
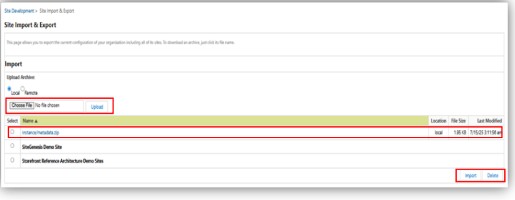
Upload the Metadata File:
Under the Import section, select Choose File under the Local tab.
Select the .zip file you created from the metadata folder.
Click Upload to upload the file to the server.
Import the Metadata:
After uploading, the file will appear under a path such asinstance/metadata.zip or a similarly named folder.
Select the appropriate folder containing your ZIP file (e.g., instance/metadata.zip).
Click Import to begin the metadata import process.
Verify the Imported Metadata:
Once the import is complete, metadata such as custom preferences, system objects, and configurations will be created with their default values.
To verify:
Navigate to Merchant Tools
Select your configured site
Go to Site Preferences → Custom Preferences -> CereTax Configuration
Configure custom preferences in Business Manager
After successfully importing the metadata, follow the steps below to configure the custom preferences required to activate the CereTax integration:
Navigate to Custom Preferences:
In Business Manager, go to: Merchant Tools > Site Preferences > Custom Site Preference Groups > CereTax Configuration
Access the Configuration Panel:
Click on CereTax Configuration to open the settings panel.
You will see a screen displaying various custom preference fields specific to the CereTax integration.
Enable CereTax Integration:
Locate the Enable CereTax checkbox or toggle.
Set this to yes or checked to activate the plugin for the selected site.
Configure Required API Credentials:
API Key: Enter the API Key provided by CereTax. This key is used to authenticate requests to the CereTax service
Profile ID: Enter the Profile ID corresponding to your account/environment on CereTax.
Once all required fields are updated, click Apply or Save at the bottom of the page to store the changes
Configuring Pricing and Promotions for Gross Site
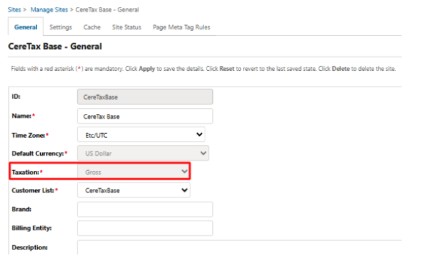
Viewing your Site's Taxation Policy
To check the taxation policy configured for your site:
Navigate to Administration > Manage Site.
Choose Your Site from the list.
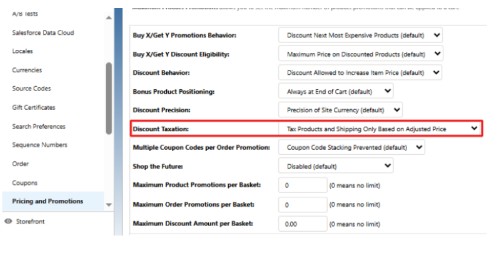
Update Discount Taxation Settings
If your site's taxation policy is set to Gross, update the Discount Taxation setting as follows:
Set the picklist value to "Tax Products and Shipping Only Based on Adjusted Price".
Update Revenue Includes Tax Settings
if your site's taxation policy is set to Gross, update the CereTax ReveneuIncludesTax Custom Preference settings as follows:
Navigate to Merchant Tools > Custom Preferences > Click the CereTax Tax Configuration
Locate CereTax RevenueincludesTax and set the value to True.
CereTax PS Codes Management
This feature allows admins to view, search, and download CereTax PS Codes directly from the menu. It provides advanced functionalities such as pagination, search by PS Code or description, and CSV export of search results.
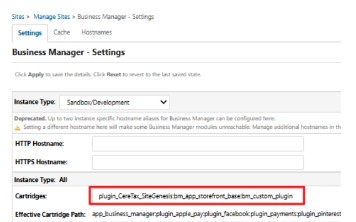
Admin-Level Configuration
Navigate to Administration> Manage Rules > Click Business Manager under Business Manager Site Selection.
Add plugin_CereTax_SiteGenesis next to the left of cartridges and apply.
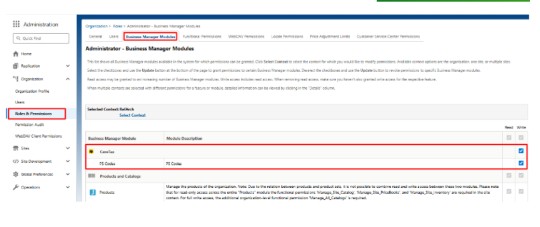
Navigate to Administration > Roles & Permission > Administrator > Business Manager Modules
Select the site from the dropdown list for which you want to enable this feature
Click Apply to confirm and activate the feature for the selected site.
Locate the PS Codes and grant them write permissions so that they become available as a menu item.
CereTax PS Codes Menu item
Navigate to Merchant Tools > CereTax > PS Codes
CereTax PsCode Configuration at Product Level
CereTax either provides a link or a CSV file through which customers can configure the PS Code on each product in the b2c commerce cloud.
To ensure accurate tax calculation with CereTax, you must assign the appropriate PS Code to each product at the site level.
Steps to Configure the CereTax PS Code:
Navigate to the Product:
In Business Manager, go to: Merchant Tools > Products and Catalogs > Products
Search for and select the product you want to configure by entering the ProductID or Product Name
Access General Product Settings (Customer needs to follow these steps for each product):
On the product detail page, go to the general tab
Scroll down to find the CereTax PsCode field
Set Site-Specific PS Code:
Click on All Site Values next to the CereTax PS Code field.
A new screen will open the PS Code configuration for all associated sites.
Enable Editing:
Click the Lock icon to unlock the fields for editing.
Configure the PS Code for Specific Site:
Uncheck the Use Default checkbox for the desired site
Enter the appropriate CereTax PS Code value for that site.
Save the Changes
Click Apply to save the updated PS Code value for the product.
Reporting
Advanced Order Search
To find orders based on their CereTax transaction ID (KSUID):
Log in to Business Manager
Navigate to Merchant Tools > Ordering > Orders.
Open the Advanced section in the filter panel (top of the page).
Scroll down or expand the Extended Attributes section.
Locate the field labeled CereTax KSUID.
Enter the relevant KSUID value and click Find or Search.
The system will return any order(s) that match the provided transaction ID.
Sales Tax Breakdown
To view a detailed breakdown of taxes applied to an order:
Navigate to Merchant Tools > Ordering > Orders.
Search for and select the specific Order Number you want to review.
On the Order Detail page, go to the Notes tab.
Here, you will find a CereTax Tax Breakdown, which typically includes Tax jurisdiction details, Tax rates applied, taxable amounts, etc.